
The previous post went over the planned redundancy aspect of this setup at the storage, networking and control plane level. Now let’s see how to get those systems installed and configured for this setup.
Firmware updates and configuration
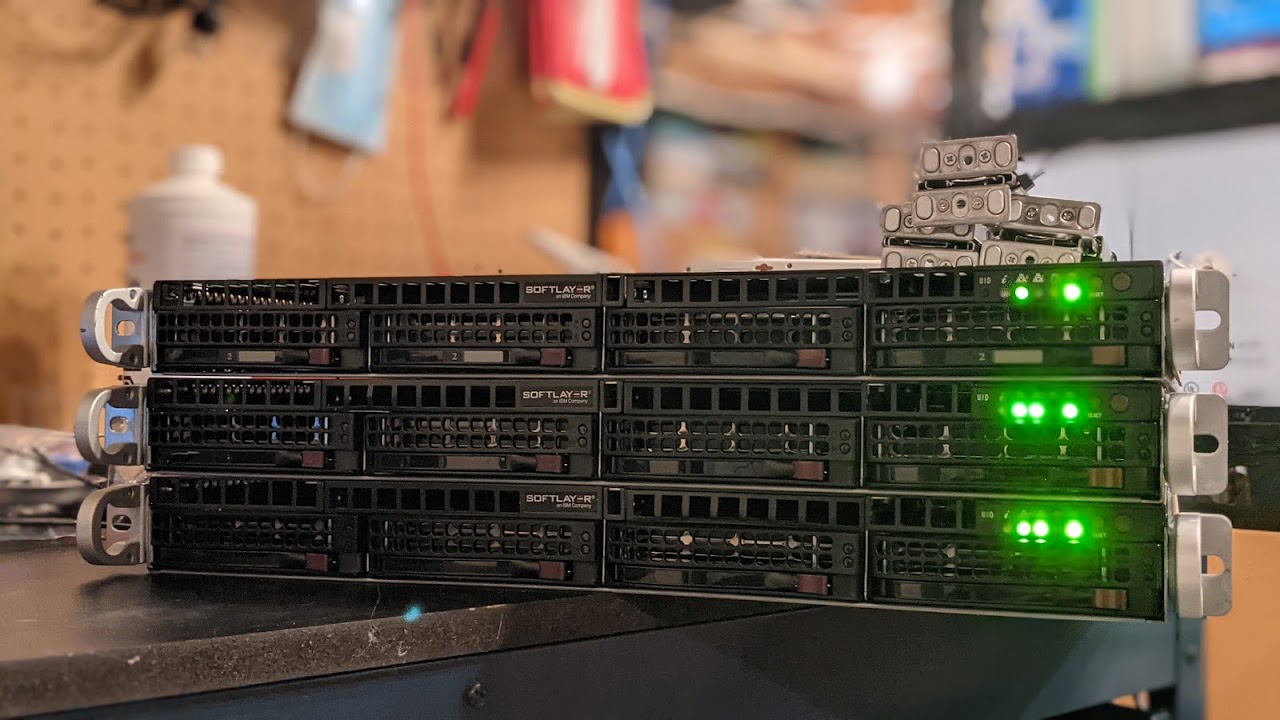
First thing first, whether its systems coming from an eBay seller or straight from the factory, the first step is always to update all firmware to the latest available.
In my case, that meant updating the SuperMicro BMC firmware and then the BIOS/UEFI firmware too. Once done, perform a factory reset of both the BMC and UEFI config and then go through the configuration to get something that suits your needs.
The main things I had to tweak other than the usual network settings and accounts were:
- Switch the firmware to UEFI only and enable Secure Boot
This involves flipping all option ROMs to EFI, disabling CSM and enabling Secure Boot using the default keys. - Enable SR-IOV/IOMMU support
Useful if you ever want to use SR-IOV or PCI device passthrough. - Disable unused devices
In my case, the only storage backplane is connected to a SAS controller with nothing plugged into the SATA controller, so I disabled it. - Tweak storage drive classification
The firmware allows configuring if a drive is HDD or SSD, presumably to control spin up on boot.
Base OS install
With that done, I grabbed the Ubuntu 20.04.1 LTS server ISO, dumped it onto a USB stick and booted the servers from it.
I had all servers and their BMCs connected to my existing lab network to make things easy for the initial setup, it’s easier to do complex network configuration after the initial installation.
The main thing to get right at this step is the basic partitioning for your OS drive. My original plan was to carve off some space from the NVME drive for the OS, unfortunately after an initial installation done that way, I realized that my motherboard doesn’t support NVME booting so ended up reinstalling, this time carving out some space from the SATA SSD instead.
In my case, I ended up creating a 35GB root partition (ext4) and 4GB swap partition, leaving the rest of the 2TB drive unpartitioned for later use by Ceph.
With the install done, make sure you can SSH into the system, also check that you can access the console through the BMC both through VGA and through the IPMI text console. That last part can be done by dumping a file in /etc/default/grub.d/ that looks like:
GRUB_CMDLINE_LINUX="${GRUB_CMDLINE_LINUX} console=tty0 console=ttyS1,115200n8"
Finally you’ll want to make sure you apply any pending updates and reboot, then check dmesg for anything suspicious coming from the kernel. Better catch compatibility and hardware issues early on.
Networking setup
On the networking front you may remember I’ve gotten configs with 6 NICs, two gigabit ports and four 10gbit ports. The gigabit NICs are bonded together and go to the switch, the 10gbit ports are used to create a mesh with each server using a two ports bond to the others.
Combined with the dedicated BMC ports, this ends up looking like this:
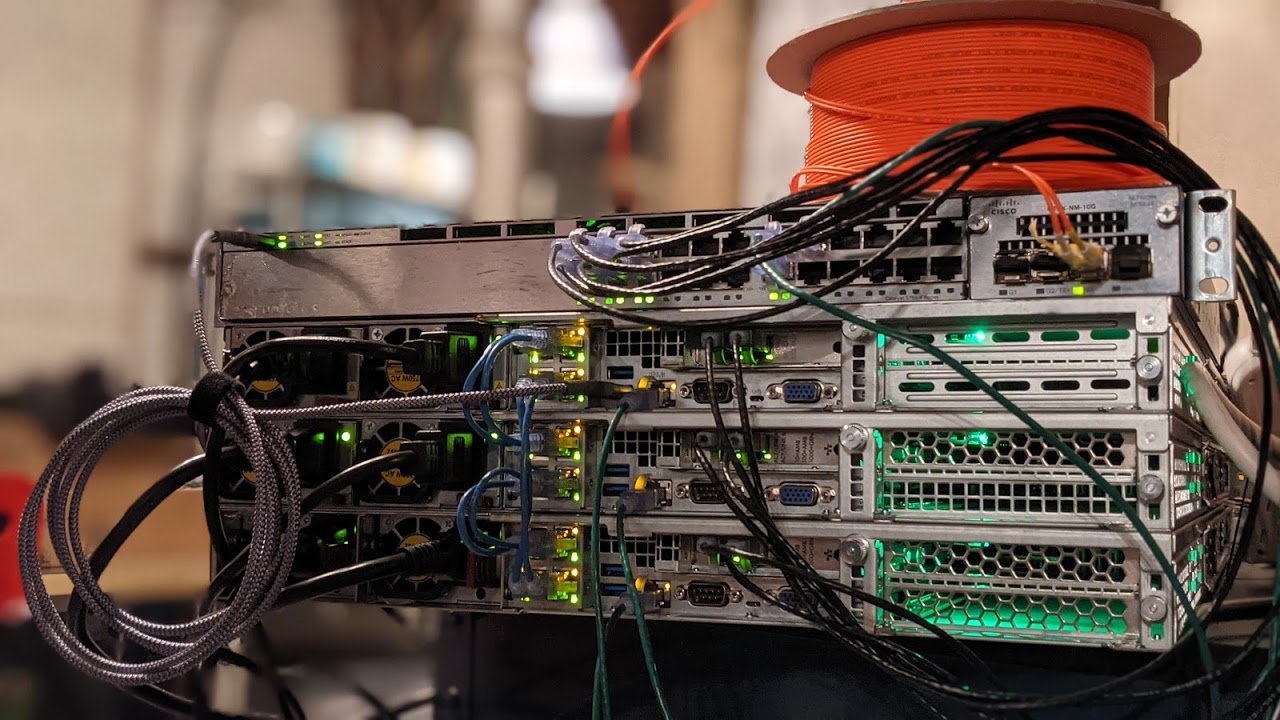
Here we can see the switch receiving its uplink over LC fiber, each server has its BMC plugged into a separate switch port and VLAN (green cables), each server is also connected to the switch with a two port bond (black cables) and each server is connected to the other two using a two port bond (blue cables).
Ubuntu uses Netplan for its network configuration these days, the configuration on those servers looks something like this:
network:
  version: 2
  ethernets:
    enp3s0f0:
      accept-ra: false
      dhcp4: false
      dhcp6: false
      mtu: 9000
    enp3s0f1:
      accept-ra: false
      dhcp4: false
      dhcp6: false
      mtu: 9000
    enp1s0f0:
      accept-ra: false
      dhcp4: false
      dhcp6: false
      mtu: 9000
    enp1s0f1:
      accept-ra: false
      dhcp4: false
      dhcp6: false
      mtu: 9000
    ens1f0:
      accept-ra: false
      dhcp4: false
      dhcp6: false
      mtu: 9000
    ens1f1:
      accept-ra: false
      dhcp4: false
      dhcp6: false
      mtu: 9000

  bonds:
    # Connection to first other server
    bond-mesh01:
      interfaces:
        - enp3s0f0
        - enp3s0f1
      accept-ra: false
      dhcp4: false
      dhcp6: false
      mtu: 9000
      parameters:
        mode: 802.3ad
        lacp-rate: fast
        mii-monitor-interval: 100
        transmit-hash-policy: layer3+4

    # Connection to second other server
    bond-mesh02:
      interfaces:
        - enp1s0f0
        - enp1s0f1
      accept-ra: false
      dhcp4: false
      dhcp6: false
      mtu: 9000
      parameters:
        mode: 802.3ad
        lacp-rate: fast
        mii-monitor-interval: 100
        transmit-hash-policy: layer3+4

    # Connection to the switch
    bond-sw01:
      interfaces:
        - ens1f0
        - ens1f1
      link-local: []
      accept-ra: false
      dhcp4: false
      dhcp6: false
      mtu: 1500
      parameters:
        mode: 802.3ad
        lacp-rate: fast
        mii-monitor-interval: 100
        transmit-hash-policy: layer3+4

  vlans:
    # WAN-HIVE
    bond-sw01.50:
      link: bond-sw01
      id: 50
      link-local: []
      accept-ra: false
      dhcp4: false
      dhcp6: false
      mtu: 1500

    # INFRA-UPLINK
    bond-sw01.100:
      link: bond-sw01
      id: 100
      link-local: []
      accept-ra: false
      dhcp4: false
      dhcp6: false
      mtu: 1500

    # INFRA-HOSTS
    bond-sw01.101:
      link: bond-sw01
      id: 101
      link-local: []
      accept-ra: false
      dhcp4: false
      dhcp6: false
      mtu: 1500

    # INFRA-BMC
    bond-sw01.102:
      link: bond-sw01
      id: 102
      link-local: []
      accept-ra: false
      dhcp4: false
      dhcp6: false
      mtu: 1500

  bridges:
    # WAN-HIVE
    br-wan-hive:
      interfaces:
        - bond-sw01.50
      link-local: []
      accept-ra: false
      dhcp4: false
      dhcp6: false
      mtu: 1500

    # INFRA-UPLINK
    br-uplink:
      interfaces:
        - bond-sw01.100
      link-local: []
      accept-ra: false
      dhcp4: false
      dhcp6: false
      mtu: 1500

    # INFRA-HOSTS
    br-hosts:
      interfaces:
        - bond-sw01.101
      accept-ra: true
      dhcp4: false
      dhcp6: false
      mtu: 1500
      nameservers:
        search:
          - stgraber.net
        addresses:
          - 2602:XXXX:Y:10::1

    # INFRA-BMC
    br-bmc:
      interfaces:
        - bond-sw01.102
      link-local: []
      accept-ra: false
      dhcp4: false
      dhcp6: false
      mtu: 1500
That’s the part which is common to all servers, then on top of that, each server needs its own tiny bit of config to setup the right routes to its other two peers, this looks like this:
network:
  version: 2
  bonds:
    # server 2
    bond-mesh01:
      addresses:
        - 2602:XXXX:Y:ZZZ::101/64
      routes:
        - to: 2602:XXXX:Y:ZZZ::100/128
          via: fe80::ec7c:7eff:fe69:55fa

    # server 3
    bond-mesh02:
      addresses:
        - 2602:XXXX:Y:ZZZ::101/64
      routes:
        - to: 2602:XXXX:Y:ZZZ::102/128
          via: fe80::8cd6:b3ff:fe53:7cc

  bridges:
    br-hosts:
      addresses:
        - 2602:XXXX:Y:ZZZ::101/64
My setup is pretty much entirely IPv6 except for a tiny bit of IPv4 for some specific services so that’s why everything above very much relies on IPv6 addressing, but the same could certainly be done using IPv4 instead.
With this setup, I have a 2Gbit/s bond to the top of the rack switch configured to use static addressing but using the gateway provided through IPv6 router advertisements. I then have a first 20Gbit/s bond to the second server with a static route for its IP and then another identical bond to the third server.
This allows all three servers to communicate at 20Gbit/s and then at 2Gbit/s to the outside world. The fast links will almost exclusively be carrying Ceph, OVN and LXD internal traffic, the kind of traffic that’s using a lot of bandwidth and requires good latency.
To complete the network setup, OVN is installed using the ovn-central and ovn-host packages from Ubuntu and then configured to communicate using the internal mesh subnet.
This part is done by editing /etc/default/ovn-central on all 3 systems and updating OVN_CTL_OPTS to pass a number of additional parameters:
--db-nb-addrto the local address--db-sb-addrto the local address--db-nb-cluster-local-addrto the local address--db-sb-cluster-local-addrto the local address--db-nb-cluster-remote-addrto the first server’s address--db-sb-cluster-remote-addrto the first server’s address--ovn-northd-nb-dbto all the addresses (port 6641)--ovn-northd-sb-dbto all the addresses (port 6642)
The first server shouldn’t have the remote-addr ones set as it’s the bootstrap server, the others will then join that initial server and join the cluster at which point that startup argument isn’t needed anymore (but it doesn’t really hurt to keep it in the config).
If OVN was running unclustered, you’ll want to reset it by wiping /var/lib/ovn and restarting ovn-central.service.
Storage setup
On the storage side, I won’t go over how to get a three nodes Ceph cluster, there are many different ways to achieve that using just about every deployment/configuration management tool in existence as well as upstream’s own ceph-deploy tool.
In short, the first step is to deploy a Ceph monitor (ceph-mon) per server, followed by a Ceph manager (ceph-mgr) and a Ceph metadata server (ceph-mds). With that done, one Ceph OSD (ceph-osd) per drive needs to be setup. In my case, both the HDDs and the NVME SSD are consumed in full for this while for the SATA SSD I created a partition using the remaining space from the installation and put that into Ceph.
At that stage, you may want to learn about Ceph crush maps and do any tweaking that you want based on your storage setup.
In my case, I have two custom crush rules, one which targets exclusively HDDs and one which targets exclusively SSDs. I’ve also made sure that each drive has the proper device class and I’ve tweaked the affinity a bit such that the faster drives will be prioritized for the first replica.
I’ve also created an initial ceph fs filesystem for use by LXD with:
ceph osd pool create lxd-cephfs_metadata 32 32 replicated replicated_rule_ssd
ceph osd pool create lxd-cephfs_data 32 32 replicated replicated_rule_hdd
ceph fs new lxd-cephfs lxd-cephfs_metadata lxd-cephfs_data
ceph fs set lxd-cephfs allow_new_snaps true
This makes use of those custom rules, putting the metadata on SSD with the actual data on HDD.
The cluster should then look something a bit like that:
root@langara:~# ceph status
  cluster:
    id:     dd7a8436-46ff-4017-9fcb-9ef176409fc5
    health: HEALTH_OK

  services:
    mon: 3 daemons, quorum abydos,langara,orilla (age 37m)
    mgr: langara(active, since 41m), standbys: abydos, orilla
    mds: lxd-cephfs:1 {0=abydos=up:active} 2 up:standby
    osd: 12 osds: 12 up (since 37m), 12 in (since 93m)

  task status:
    scrub status:
        mds.abydos: idle

  data:
    pools:   5 pools, 129 pgs
    objects: 16.20k objects, 53 GiB
    usage:   159 GiB used, 34 TiB / 34 TiB avail
    pgs:     129 active+clean
With the OSDs configured like so:
root@langara:~# ceph osd tree
ID  CLASS  WEIGHT    TYPE NAME         STATUS  REWEIGHT  PRI-AFF
-1         34.02979  root default
-3         11.34326      host abydos
 4    hdd   3.63869          osd.4         up   1.00000  0.12500
 7    hdd   5.45799          osd.7         up   1.00000  0.25000
 0    ssd   0.46579          osd.0         up   1.00000  1.00000
10    ssd   1.78079          osd.10        up   1.00000  0.75000
-5         11.34326      host langara
 5    hdd   3.63869          osd.5         up   1.00000  0.12500
 8    hdd   5.45799          osd.8         up   1.00000  0.25000
 1    ssd   0.46579          osd.1         up   1.00000  1.00000
11    ssd   1.78079          osd.11        up   1.00000  0.75000
-7         11.34326      host orilla
 3    hdd   3.63869          osd.3         up   1.00000  0.12500
 6    hdd   5.45799          osd.6         up   1.00000  0.25000
 2    ssd   0.46579          osd.2         up   1.00000  1.00000
 9    ssd   1.78079          osd.9         up   1.00000  0.75000
LXD setup
The last piece is building up a LXD cluster which will then be configured to consume both the OVN networking and Ceph storage.
For OVN support, using an LTS branch of LXD won’t work as 4.0 LTS predates OVN support, so instead I’ll be using the latest stable release.
Installation is as simple as: snap install lxd --channel=latest/stable
Then on run lxd init on the first server, answer yes to the clustering question, make sure the hostname is correct and that the address used is that on the mesh subnet, then create the new cluster setting an initial password and skipping over all the storage and network questions, it’s easier to configure those by hand later on.
After that, run lxd init on the remaining two servers, this time pointing them to the first server to join the existing cluster.
With that done, you have a LXD cluster:
root@langara:~# lxc cluster list
+----------+-------------------------------------+----------+--------+-------------------+--------------+----------------+
|   NAME   |                 URL                 | DATABASE | STATE  |      MESSAGE      | ARCHITECTURE | FAILURE DOMAIN |
+----------+-------------------------------------+----------+--------+-------------------+--------------+----------------+
| server-1 | https://[2602:XXXX:Y:ZZZ::100]:8443 | YES      | ONLINE | fully operational | x86_64       | default        |
+----------+-------------------------------------+----------+--------+-------------------+--------------+----------------+
| server-2 | https://[2602:XXXX:Y:ZZZ::101]:8443 | YES      | ONLINE | fully operational | x86_64       | default        |
+----------+-------------------------------------+----------+--------+-------------------+--------------+----------------+
| server-3 | https://[2602:XXXX:Y:ZZZ::102]:8443 | YES      | ONLINE | fully operational | x86_64       | default        |
+----------+-------------------------------------+----------+--------+-------------------+--------------+----------------+
Now that cluster needs to be configured to access OVN and to use Ceph for storage.
On the OVN side, all that’s needed is: lxc config set network.ovn.northbound_connection tcp:<server1>:6641,tcp:<server2>:6641,tcp:<server3>:6641
As for Ceph creating a Ceph RBD storage pool can be done with:
lxc storage create ssd ceph source=lxd-ssd --target server-1
lxc storage create ssd ceph source=lxd-ssd --target server-2
lxc storage create ssd ceph source=lxd-ssd --target server-3
lxc storage create ssd ceph
And for Ceph FS:
lxc storage create shared cephfs source=lxd-cephfs --target server-1
lxc storage create shared cephfs source=lxd-cephfs --target server-2
lxc storage create shared cephfs source=lxd-cephfs --target server-3
lxc storage create shared cephfs
In my case, I’ve also setup a lxd-hdd pool, resulting in a final setup of:
root@langara:~# lxc storage list
+--------+-------------+--------+---------+---------+
|  NAME  | DESCRIPTION | DRIVER |  STATE  | USED BY |
+--------+-------------+--------+---------+---------+
| hdd    |             | ceph   | CREATED | 1       |
+--------+-------------+--------+---------+---------+
| shared |             | cephfs | CREATED | 0       |
+--------+-------------+--------+---------+---------+
| ssd    |             | ceph   | CREATED | 16      |
+--------+-------------+--------+---------+---------+
Up next
The next post is likely to be quite network heavy, going into why I’m using dynamic routing and how I’ve got it all setup. This is the missing piece of the puzzle in what I’ve shown so far as without it, you’d need an external router with a bunch of static routes to send traffic to the OVN networks.
 Github
 Twitter
 LinkedIn
 Mastodon
Really keen to see the next post in this series, loving your work so far.
This has been very helpful, Looking forward to the next part in this series of posts.
I found your article very interesting and maybe I get many question in mind. But, first I want to know. Is it MAAS involved in your server deployment?
You can tweak ceph rbd client settings so that rbd reads go to the local ceph osd node (instead of the primary osd for the placement group – which 66% of the time will be on another node in the cluster) with the global ceph setting:
rbd_read_from_replica_policy = localize
Yeah, I actually have that set in my ceph.conf already to reduce the traffic somewhat.
This setup isn’t all that dynamic, in that you can’t expand the cluster with one more node without first adding two more 10Gbit-nics to each existing node, right?
Or could a fourth cluster been added with ease?
Sorry for the question, I am trying to perform a similar setup and trying to use a partition of one of the SSD, however, I am having trouble with it.
I tried quincy cephadm with a specific osdservice.yaml and lso microceph and I haven’t been able to use a partition,
it has only worked with the whole SSD
If you can point out the CEPH configuration to use partitions that would be great.
Thanks
Luis
What has been your experience with consumer NVME/SSD on this cluster.
Ceph recomments Enterprise SSD/NVME with PLP, but of course on a budget that is out of the question.
Have you had to upgrade the storage to Enterprise grade?
The OS drives are still on consumer SSDs and I’ve not really had any issues with that.
However the storage SSDs, those I’ve replaced with higher capacity enterprise drives as SMART was reporting the original drives were reaching the end of their life after over 3 years of constant operation.